
15 DIY IKEA Christmas Tree Alternatives You Can Make at Home
Picture a calm, glowing corner that looks straight out of a Scandinavian showroom. No bulky box, no big price tag, no storage headaches. If you love the clean look of an IKEA Christmas tree but want something more personal, this list is for you.
Inside are 15 easy DIY ideas you can make at home with simple materials, from a leaning ladder to a pleated paper tree. Every year, I notice the same struggle: small rooms, tight budgets, and trees that take over the whole space. I’ve tried many of these ideas myself, and most came together in a single afternoon. Each one is beginner-friendly, budget-conscious, and designed to fit real homes, including apartments and rentals. Keep scrolling, save your favorites, and find the idea that makes your holiday corner feel cozy, stylish, and completely yours.
Ladder Shelf Tree
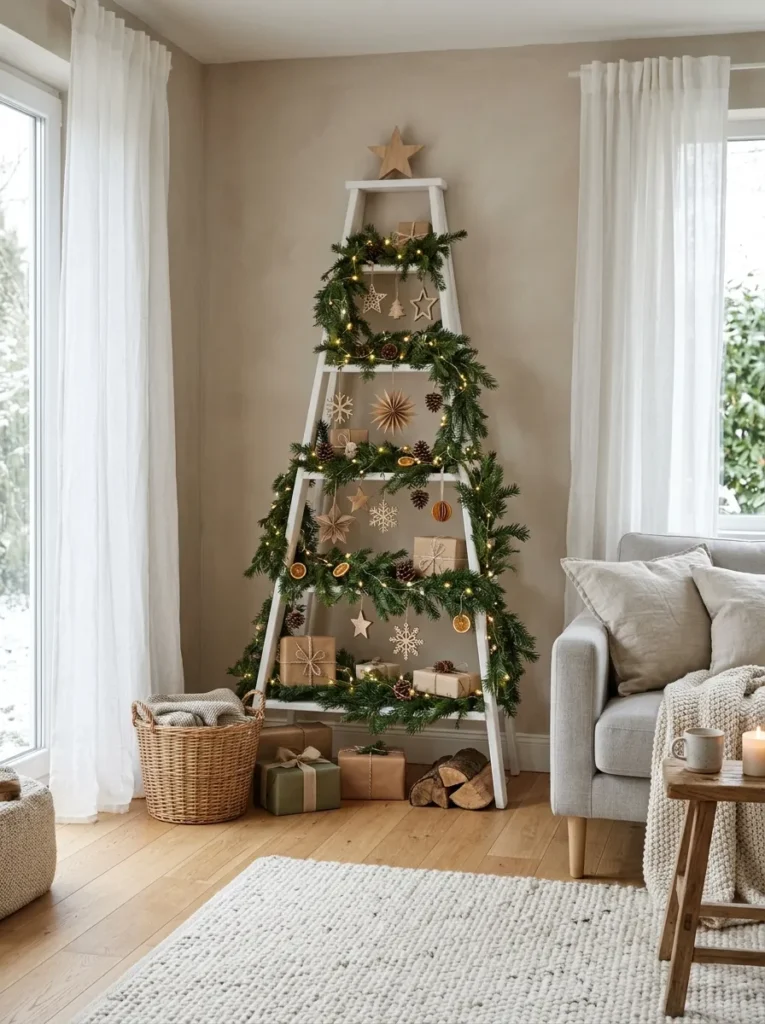
- Turns a simple ladder into a slim, tree-shaped focal point
- Frees up floor space in small living rooms and apartments
- Each rung gives you a shelf for ornaments, mini gifts, or pinecones
- Packs flat after the holidays, so storage is easy
Small space, big holiday feeling? A leaning ladder shelf might be the easiest answer. Its natural slope already looks like a tree, so you only need greenery, lights, and a few ornaments to finish the shape. I’ve noticed that this idea works best in apartments, where floor space disappears fast. The narrow base keeps walkways clear, while each rung holds garland, pinecones, or tiny gifts at different heights. It also folds away after the season, which makes storage simple. Choose a pale wood tone and the whole corner feels calm, bright, and wonderfully Scandinavian without costing much.
Want a look that feels styled, not crowded? Start by wrapping the ladder with a thin garland, then add warm white lights from top to bottom. Place the biggest ornaments on the lowest rungs and the smallest near the top, so the shape reads like a real tree. A simple star or wooden bead topper finishes it. This works well beside a sofa or by a window, where the glow shows up at night. The result looks airy, handmade, and cozy, and it gives guests something unexpected to notice and ask about.
Branch Vase Tree
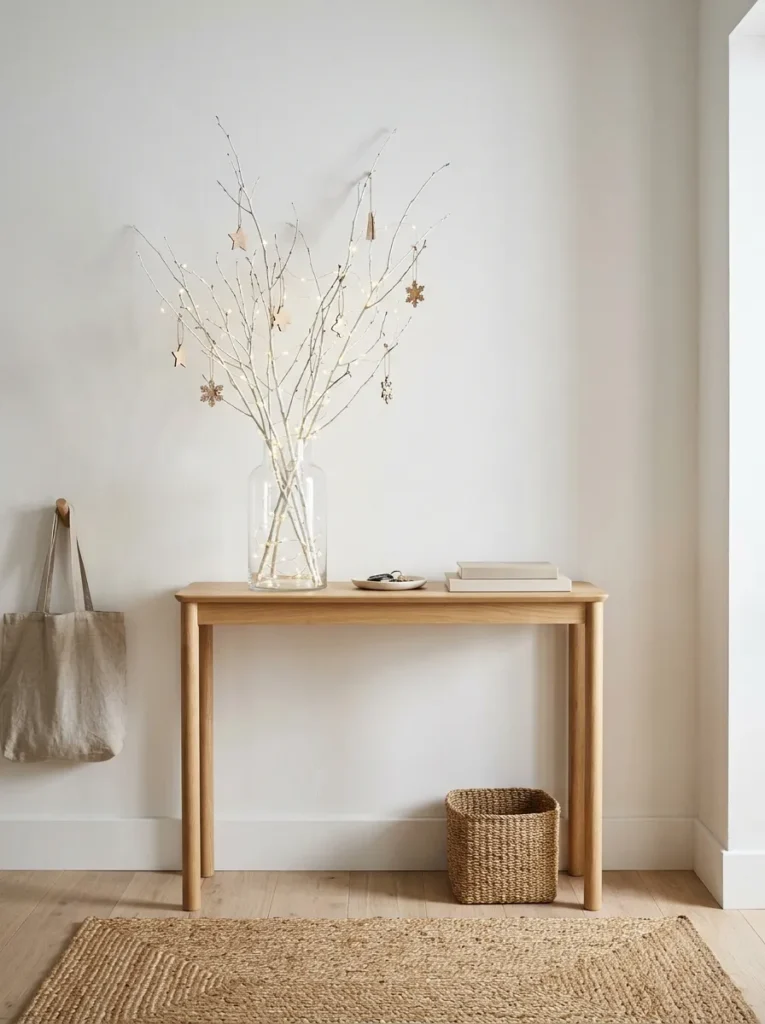
- Brings a natural, sculptural shape into the room
- Fits narrow shelves, consoles, and entry tables
- Costs very little, since the branches are free
- Keeps the look light and open instead of bulky
Who says a holiday tree needs a full trunk? A few bare branches in a tall glass vase can feel just as magical. Gather sticks from your yard, paint them white or leave them natural, and arrange them with the tallest in the middle. I’ve tried this on a narrow console table, and the open shape made the entryway feel lighter, not busier. Add tiny ornaments and a thin string of lights, and the branches glow. It costs little, takes about twenty minutes, and works for renters, small homes, or anyone who wants a quieter holiday look.
Here’s the secret to making it look styled: keep the palette simple. Use two or three ornament colors, like warm wood, soft white, and a touch of muted green. Hang lighter pieces near the tips, since thin branches bend under heavy decorations. A tall vase also helps, because it anchors the branches and adds a clean, sculptural base. Many designers recommend placing the arrangement near a window or mirror, so the lights double in the evening. The final look feels airy, handmade, and calm. Negative space lets each ornament stand out like a small glowing detail.
Pegboard Light Tree
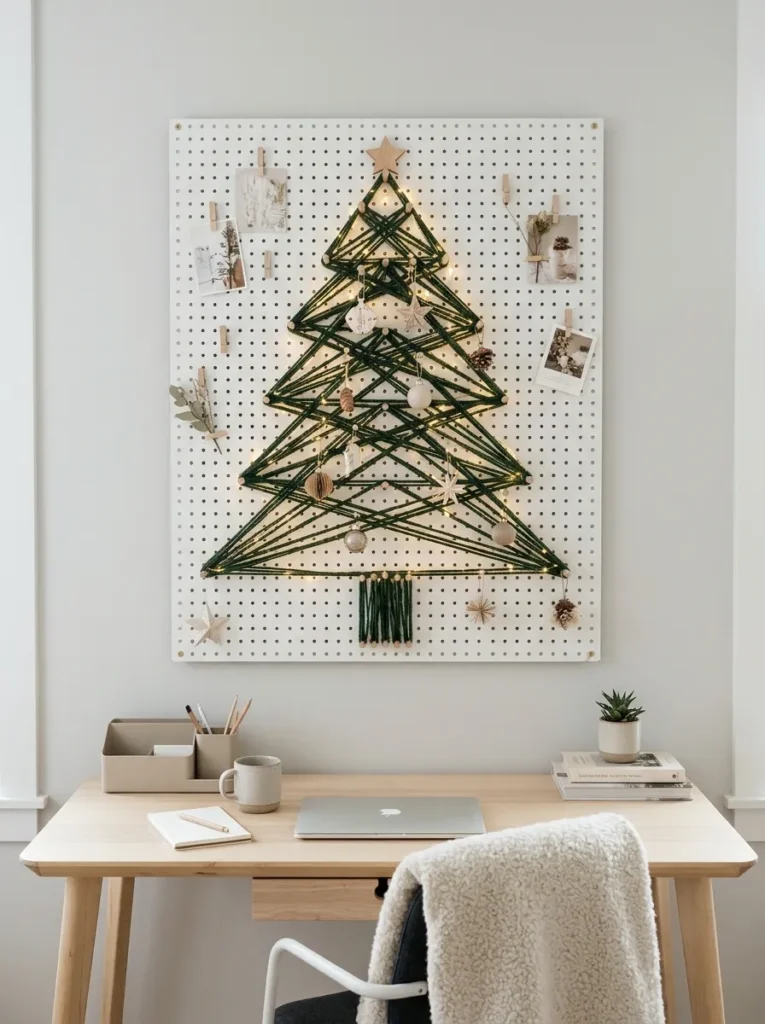
- Creates a tree on the wall, so nothing touches the floor
- Works well in kids’ rooms, dorms, and home offices
- Easy to resize, recolor, and redo every year
- Adds a playful, modern touch to a plain wall
Looking for a tree that never touches the floor? A pegboard might surprise you. Mount a white board on the wall, then outline a triangle with green yarn or thin ribbon wrapped around the pegs. It becomes a flat, modern take on the classic IKEA Christmas tree look, but fully customized. I’ve seen this work well in kids’ rooms and home offices, where floor space matters and little hands can’t knock anything over. Add warm lights along the edges, and the wall turns into a soft glowing focal point that feels playful, tidy, and ready for gifts.
Ready to make it feel finished? Choose a simple palette of green, white, and natural wood, then hang mini ornaments from the pegs using small hooks. Keep the spacing even so the triangle stays crisp from across the room. Layer in paper stars or tiny wrapped boxes on the lower rows for a bit of depth. In my experience, lightweight decorations work best, since pegs can’t carry much weight. The finished wall looks clean, creative, and easy to update, and you can reuse the same setup every December with new colors.
Book Stack Tree

- Uses books you already own, so it costs nothing
- Builds a tree shape in minutes with no tools
- Adds height and texture to a plain side table
- Easy to take apart and shelve again
Have a shelf full of favorite books? Turn them into a tree. Stack your largest books at the bottom and shrink the size as you climb, so the pyramid mimics a real evergreen. Choose spines in cream, sage, and grey for a soft, cohesive look. I’ve tried this on a small side table, and it took about ten minutes. Slip a strand of warm lights between the layers, then add a tiny star on top. It feels thoughtful, bookish, and personal, and it needs no storage box when the season ends. Everything simply goes back on the shelf.
Want the stack to look styled, not messy? Pick books with matching tones and face the spines outward. Keep the pile balanced by placing each layer slightly smaller than the one below. Lightweight paperbacks work well near the top, since heavy books can tip the pile. Add a small bowl of pinecones or dried oranges beside it for extra warmth. This setup suits desks, entry tables, and windowsills. The finished look is cozy, quiet, and a little unexpected, and visitors often stop to read the titles. It proves a holiday centerpiece can come from things in your home.
Wooden Dowel Cone
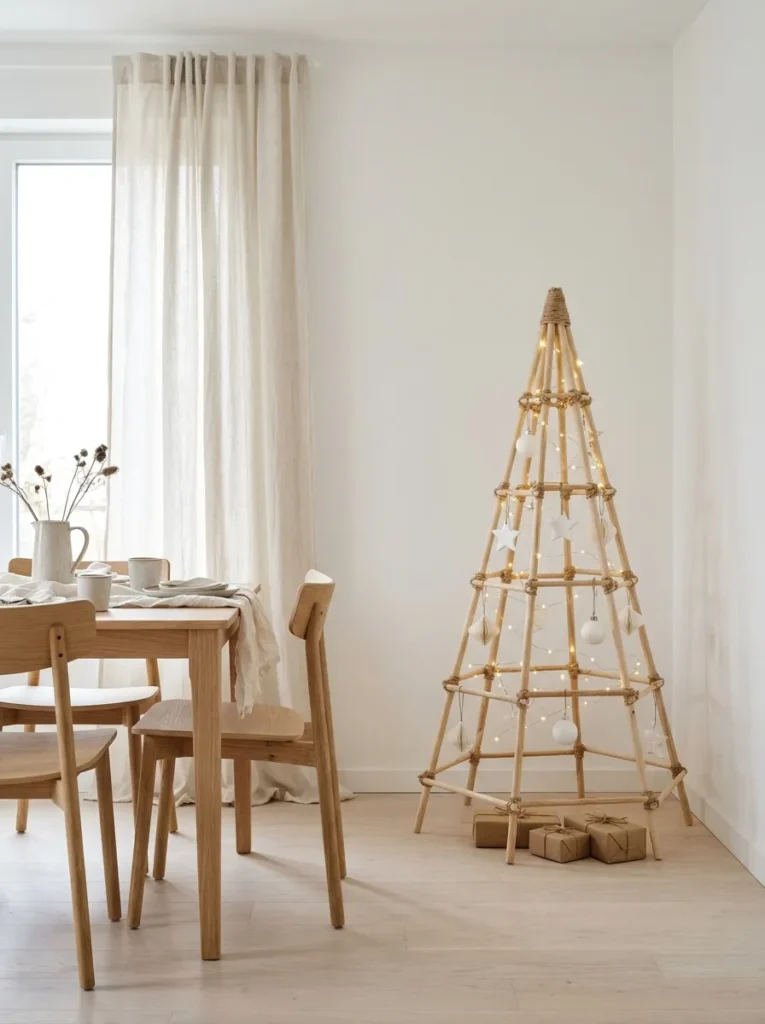
- Gives a clean, open frame with a handmade feel
- Uses affordable dowels from any hardware store
- Lets ornaments and lights show through the gaps
- Folds flat when you untie the twine
A tree made of sticks? Yes, and it looks beautiful. Lean eight to ten wooden dowels together, tie them near the top with jute twine, and spread the bases into a neat circle. The result is an open cone that reads as a tree without any needles. I’ve seen this work well in minimalist homes, where bare wood fits the calm palette. Weave a light string through the frame and hang a few small ornaments inside. It’s affordable, quick to build, and light enough to move from room to room whenever you want a fresh spot.
Want it to feel more polished? Sand the dowel ends lightly so the wood looks smooth and soft. Choose one wood tone and keep the ornaments white, cream, or muted green for a calm finish. A pale rug beneath the base helps ground the shape and protects the floor. Place it where evening light can pass through the gaps, because the shadows on the wall add a second layer of charm. The finished piece looks airy, sculptural, and modern, and it stores flat in a closet. Many homeowners reuse it every year and simply change the ornaments.
Washi Tape Wall Tree

- Creates a flat tree with just tape and a ruler
- Peels off cleanly, so it suits renters
- Lets you add photos, cards, or paper stars
- Costs only a few dollars
No floor space? No problem. A few strips of washi tape can build a full tree on any wall. Start with a center line, then add short horizontal strips that grow wider toward the bottom. The shape forms quickly and looks crisp. I’ve tried this in a rented room, and the tape peeled off cleanly afterward. Choose forest green, sage, or even gold for a softer look. Pin tiny ornaments or paper stars along the edges, then trace the outline with a thin string of lights. It’s cheap, playful, and perfect for dorms, kids’ rooms, and tight apartments.
Here’s how to make it look intentional. Measure the tree with a ruler first, so both sides match. Press the tape down slowly to avoid wrinkles, and test a small corner on painted walls before you commit. Clip small photos or holiday cards to twine beside the tree for a personal touch. In my experience, matte tape looks neater than glossy tape under lamp light. The final wall feels cheerful and tidy, and it changes the whole mood of a bedroom. When the season ends, you simply peel it away and the wall is ready for the next project.
Cardboard Cone Tree

- Turns recycled cardboard into charming mini trees
- Looks great in groups of three or five
- Perfect for shelves, mantels, and tables
- A fun project for kids and adults
Recycled cardboard can look surprisingly chic. Cut a large circle, roll it into a cone, and glue the edge firmly. In minutes, you have a tree base ready for paint, fabric, or twine. This idea is a real hit with families, because kids can help with the decorating while adults handle the cutting. Make several in different heights and group them together for a forest effect. Painted white, sage, or left kraft brown, each one feels handmade and warm. They cost almost nothing, yet they add charm to shelves and mantels throughout the holiday season.
Odd numbers always look best. Group three or five cones in varied heights, and the arrangement feels natural rather than staged. Wrap one with twine, cover another with felt, and leave a third plain for contrast. A dab of glue holds pom-poms or buttons in place. I’ve noticed that thicker cardboard keeps its shape better, so cereal boxes work well when doubled. Set the cluster on a tray or wooden board to keep it tidy. The finished look is rustic, calm, and sweet, and it brings a hand-crafted holiday feel to kitchens, entryways, and bookshelves.
Macrame Hanging Tree
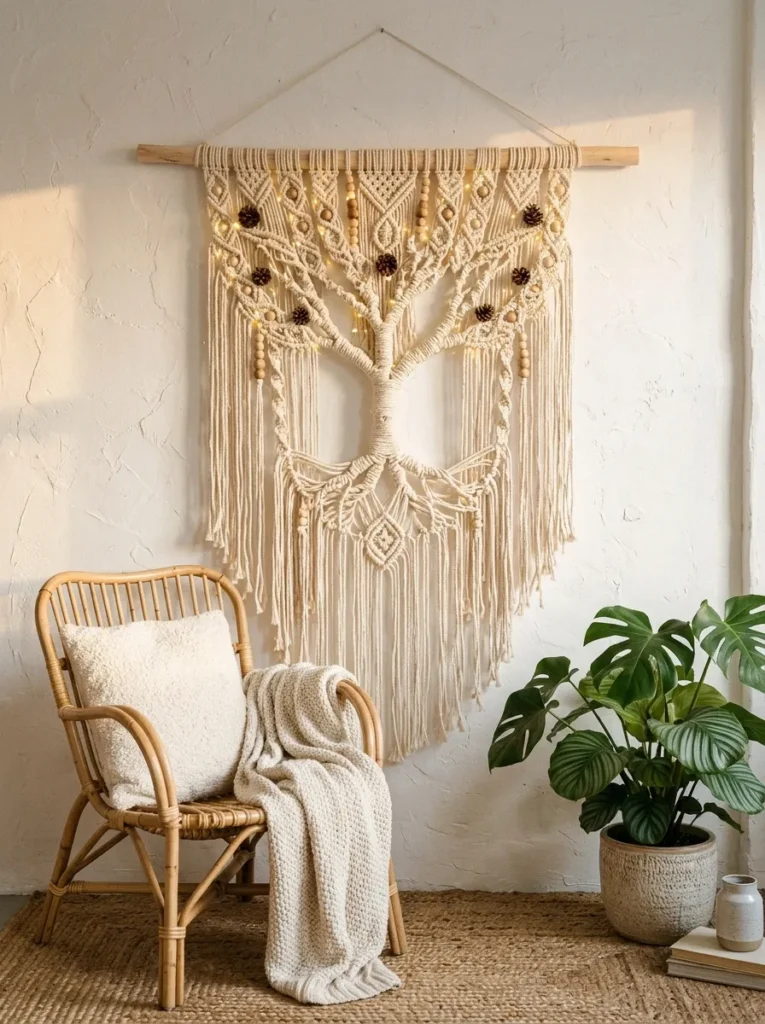
- Adds soft texture to a plain wall
- Hangs high, so pets and toddlers can’t reach it
- Mixes well with boho, farmhouse, and Scandinavian rooms
- Rolls up neatly for storage
Texture makes a holiday wall feel warm. A macrame tree hangs from a simple dowel and uses cotton cord knotted into a triangle shape. Even basic knots look beautiful once the fringe is trimmed neatly. I’ve tried a beginner version, and it took one relaxed evening with a podcast. Add wooden beads, small pinecones, or a tiny star at the top. The soft cream color blends into almost any room, while the fringe catches the light. It’s a lovely choice for people who want a tree-like feature without taking up any floor space at all.
Keep the cord thick for a bolder, easier result. Four-millimeter cotton rope works well, since it holds its shape and hides small mistakes. Cut the strands generously, because knotting uses more length than you expect. Brush the fringe gently with a comb for a soft, feathered edge. Hang it above a sofa, console, or bed so the shape becomes the star of the wall. Warm lights tucked behind the cord create a gentle glow at night. The finished piece feels calm, handmade, and cozy, and it can hang in the same spot long after the holidays if you like.
Mini Tabletop Trio
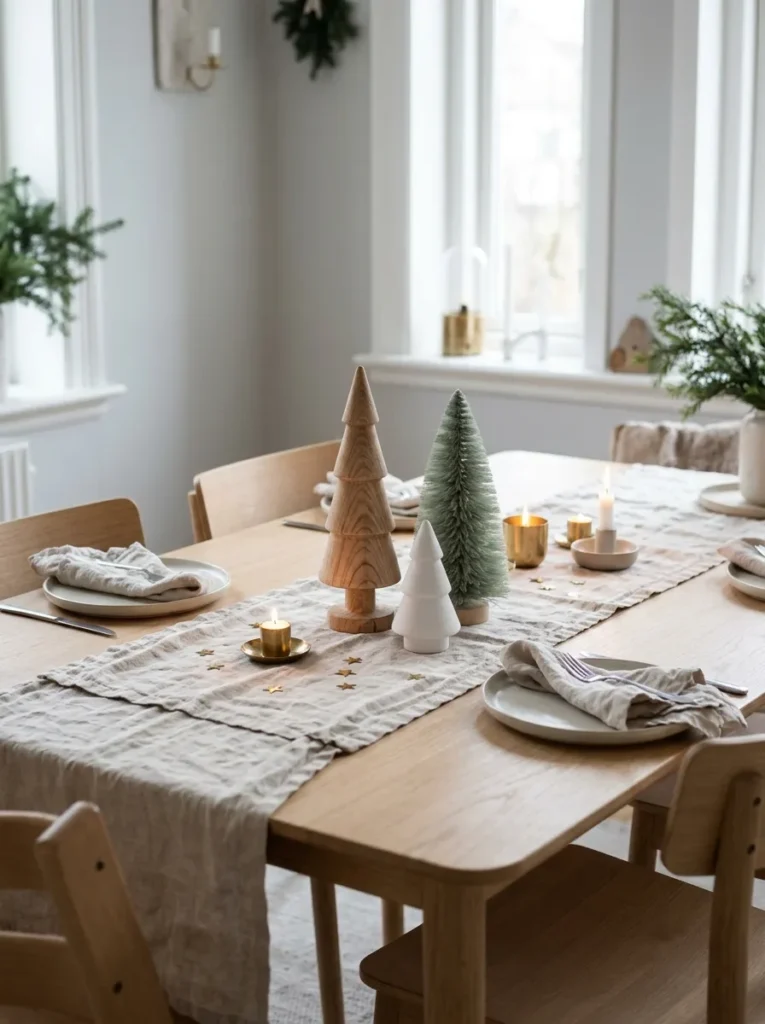
- Replaces one big tree with three small statement pieces
- Works on dining tables, desks, and windowsills
- Lets you mix textures like wood, felt, and paper
- Easy to move, gift, or rearrange
Three small trees can say more than one big one. A tabletop trio is flexible, affordable, and easy to style. Use different heights and finishes, such as a wooden cone, a felt cone, and a paper cone. The mix creates rhythm without clutter. I’ve noticed this idea works well for small dining tables, where a full tree would never fit. Set them on a linen runner and add a few tiny stars between them. It feels curated, calm, and festive. Best of all, you can move the trio from table to shelf whenever the room needs a change.
Start with the tallest tree and place it slightly off center. Then add the medium and small ones nearby, leaving a little breathing room between each. Stick to one color story, like white, sage, and natural wood, so the group looks unified. Add a small tray or runner underneath to tie everything together. Warm battery candles or a mini light string add glow without any fire risk. The finished tableau looks soft, balanced, and intentional, and it suits holiday dinners, home offices, and window ledges. Guests often assume it was expensive, even when each piece cost a few dollars.
Pallet Board Tree
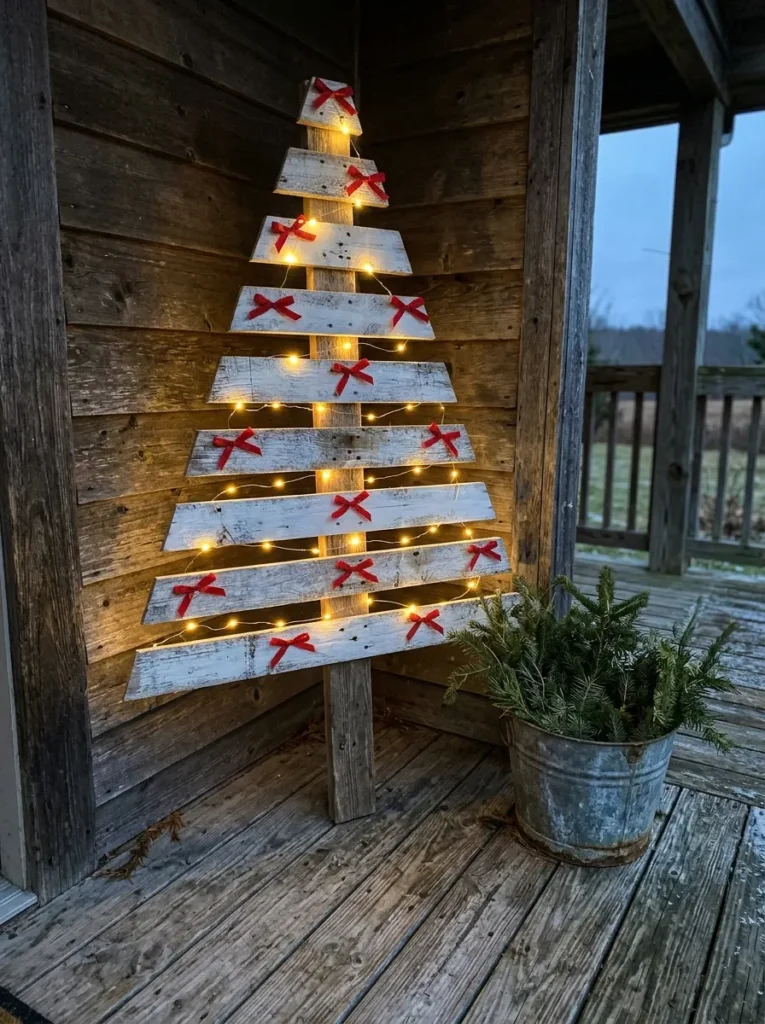
- Gives a bold, farmhouse-style tree from reclaimed wood
- Great for porches, patios, and entryways
- Sturdy enough to stay outside all season
- Can be painted, whitewashed, or left natural
Rustic charm starts with reclaimed wood. Cut pallet boards into graduated lengths, then fix them to a center post so the shortest sits at the top. The stepped outline instantly reads as a tree. I’ve seen this look stand strong on porches through wind and rain, which makes it a smart outdoor option. Sand the boards well to avoid splinters, then whitewash or leave them natural. Tie red ribbon or wrap warm lights along the edges. It brings farmhouse warmth to an entryway and gives guests a handmade greeting before they even reach the front door.
Safety and finish make all the difference. Use heat-treated or clean pallets only, and check each board for nails before you start. A coat of matte exterior paint protects the wood from moisture. Stand the post in a heavy planter filled with gravel or sand so the tree stays steady. Then add a bright ribbon, a lantern, or a tiny wreath near the base. In my experience, solar string lights are the easiest option outdoors. The finished tree looks bold, welcoming, and sturdy, and it can come back every December with just a quick refresh of paint.
Fabric Cone Tree
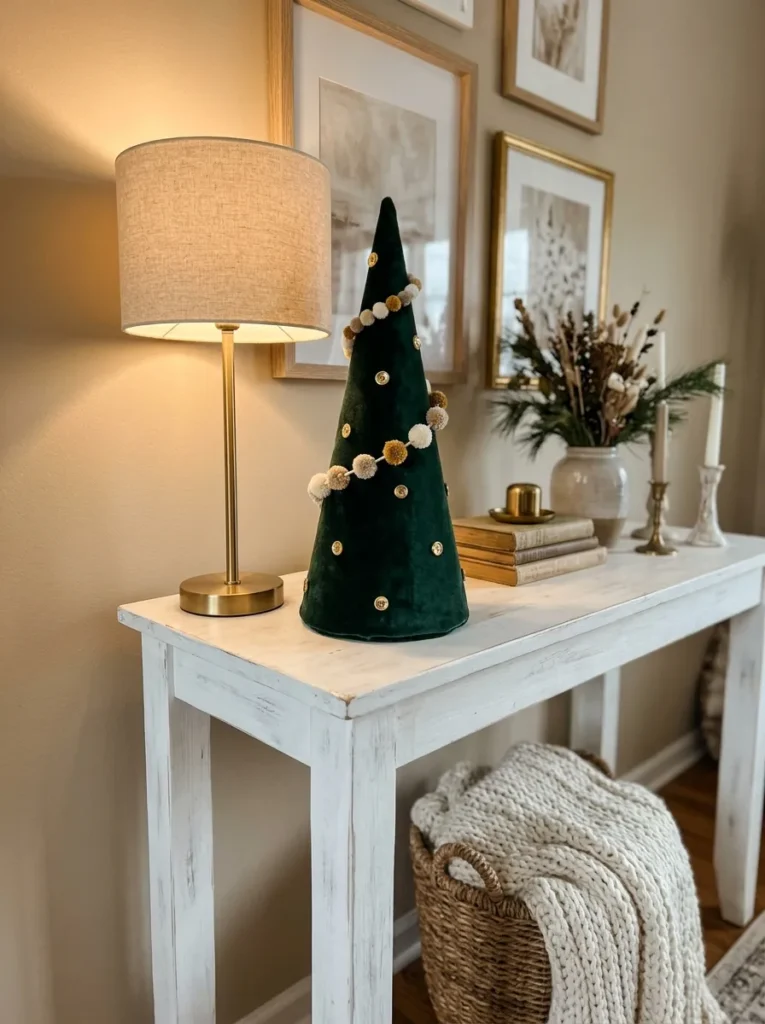
- Adds plush texture that feels soft and luxe
- Uses leftover fabric, old scarves, or felt
- Stays lightweight and safe around kids and pets
- Offers endless color options beyond green
Soft textures can make Christmas feel instantly cozy. Wrap a cardboard or foam cone in velvet, felt, or an old wool scarf, and secure it with glue. The fabric hides the base completely and gives the tree a plush, boutique look. I’ve noticed that deep green velvet photographs beautifully under lamp light. Pin on buttons or gold beads for sparkle. Because it’s light and unbreakable, it suits busy family homes, though small beads should stay out of little hands. It also gives you the freedom to match your decor, whether you love classic red, moody burgundy, or soft cream.
Choose fabric with a little weight, because thin cloth can wrinkle and show the cone beneath. Cut the piece slightly larger than needed, wrap it tightly, and glue the seam at the back. Add a neat bow, a pom-pom garland, or a single gold star at the top. Group it with battery candles or a small bowl of pinecones for extra warmth. Many designers recommend mixing two fabrics on one tree for a richer, layered look. The finished piece feels soft, elegant, and personal, and it brings a cozy hotel-lobby feel to any console or mantel.
Wire Basket Tree
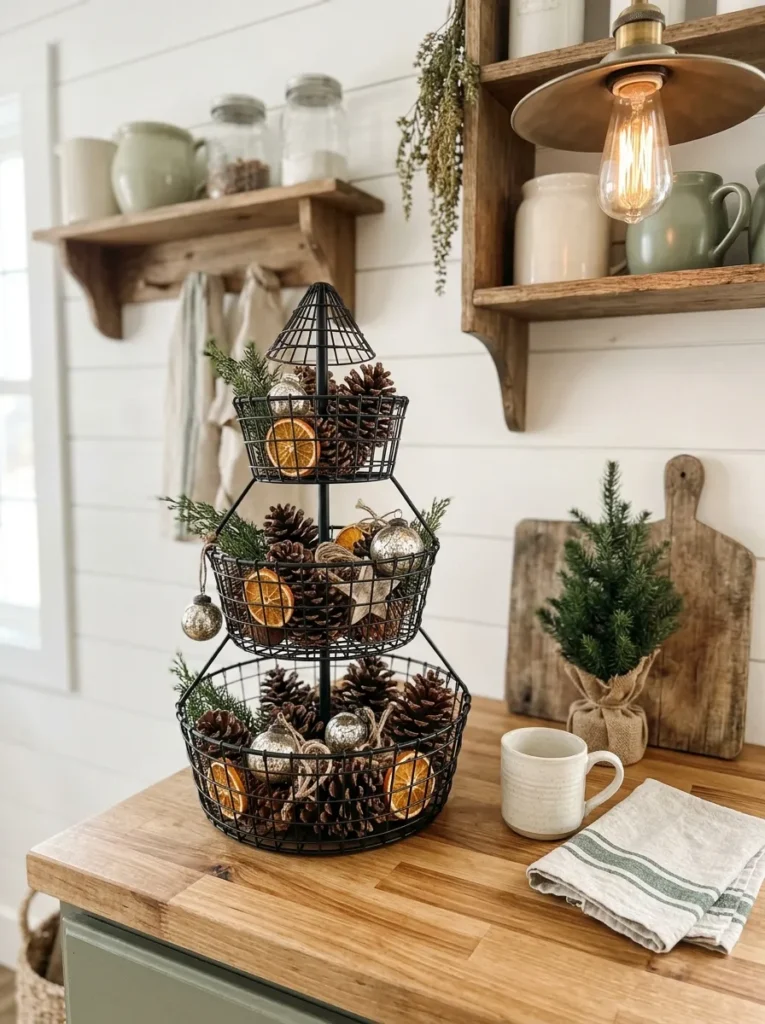
- Uses kitchen or storage baskets you may already own
- Doubles as a handy spot to display ornaments
- Brings natural textures like pinecones and citrus
- Disassembles quickly for everyday use
Storage can become decor in minutes, IKEA Christmas tree style. Stack three or four wire baskets from largest to smallest, and the stepped shape forms a charming tree. Fill each tier with pinecones, dried orange slices, and ornaments. I’ve tried this in a kitchen, and the metal frame blended beautifully with farmhouse details. The open weave lets light pass through, so the tree never feels heavy. Choose matte black for a modern look or white for a softer one. It’s an easy way to use items you already own, and everything goes back to work once the holidays end.
Stability matters, so place the largest basket on a flat counter or table first. Turn each smaller basket upside down or nest it securely, and press a small piece of museum putty between layers. Fill gaps with fresh greenery, cinnamon sticks, or dried citrus for scent and color. A tiny string of lights woven through the wires adds a soft glow in the evening. The finished piece looks natural, layered, and welcoming, and it works well on kitchen islands, side tables, and open shelves. Guests enjoy spotting the clever twist once they realize it started as everyday storage.
Wreath Stack Tree

- Builds a full, fragrant tree from simple wreaths
- Hangs on a wall or stands on a rod
- Fits tight hallways and narrow entries
- Easy to customize with ribbon and ornaments
Wreaths aren’t only for doors. Stack five or six in graduated sizes on a sturdy rod, and you get a full, textured tree with real presence. The layered rings create depth, while gaps between them let light shine through. I’ve noticed this idea works wonderfully in narrow hallways, where a traditional tree would block the path. Faux wreaths keep the look neat, but fresh ones add a lovely pine scent. Tie each layer with cream ribbon, then top the stack with a gold star. It feels elegant, welcoming, and surprisingly simple to put together in under an hour.
Size matters when stacking wreaths. Start with a 24-inch wreath at the base and drop down by about three inches for each layer above. Slide them over a metal rod set in a weighted base, or hang them on a wall hook one above another. Wire them together at the back so they stay aligned. Add small ornaments or berries only on the front, since the back may be hidden against a wall. The finished tree looks full, rich, and classic, and it saves valuable space. Many families love it because everything stores neatly, stacked in one flat pile.
Staggered Shelf Tree

- Turns existing shelves into a tree-shaped display
- Keeps the floor completely clear
- Lets you swap items as you like
- Highlights favorite ornaments and small gifts
What if your shelves became the tree? Arrange short and long boards so the longest sits at the bottom and the shortest at the top. The stepped outline gives a clean, modern triangle that feels architectural. I’ve noticed this idea works especially well in rooms with plain walls, because the shelves become both decor and storage. Fill each level with ornaments, glass jars, and small gifts. Keep the colors tight, such as white, green, and wood, so the shape stands out. It’s a smart pick for renters who want a tree-like look without taking over any precious floor.
Plan the layout on the floor first. Lay your boards out in a triangle, measure the spacing, and mark each position lightly with painter’s tape on the wall. Use a level and wall anchors so the shelves hold the weight. Keep decorations lightweight on the upper rows. Glass jars filled with greenery, mini trees, or wrapped boxes all work nicely. A narrow string of lights along the edge adds a warm outline after dark. The finished wall looks organized, modern, and festive, and after the holidays the shelves stay in place and simply return to everyday use.
Paper Fan Tree
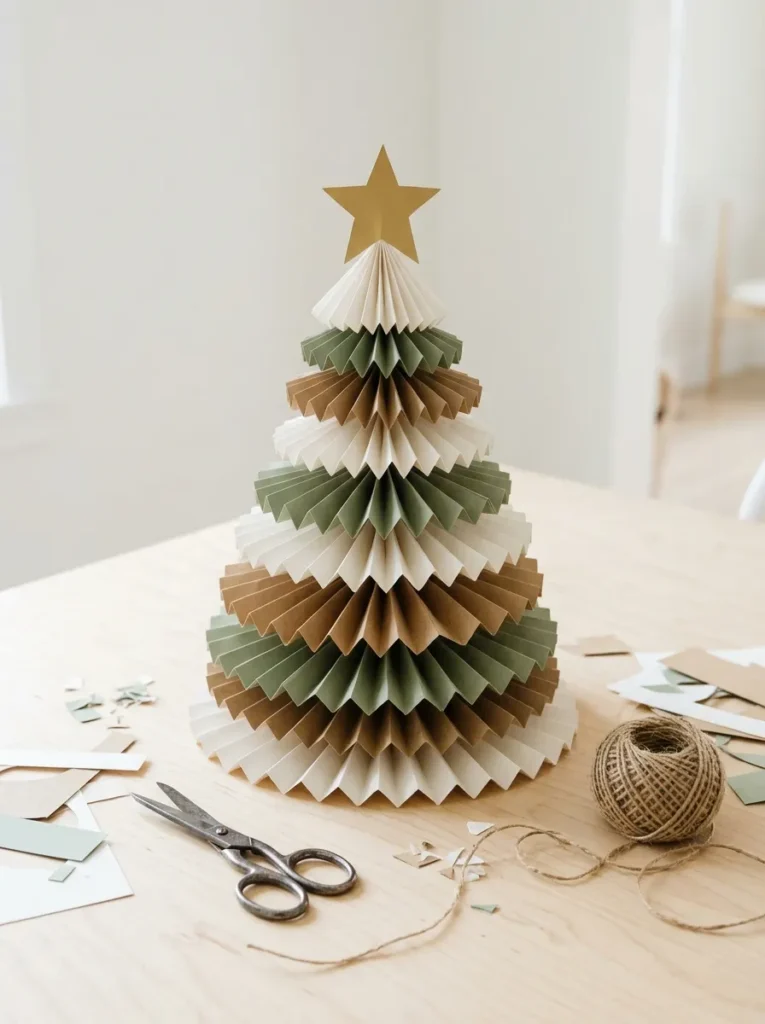
- Turns plain paper into a sculptural, pleated tree
- Costs almost nothing and takes one afternoon
- Works in any size, from mini to tall
- Looks crisp in white, kraft, or soft green
Folded paper can look like pure magic. Pleat sheets back and forth like a fan, glue the ends into rounds, and stack them in graduated sizes. The ridges catch light and cast gentle shadows, which gives the tree surprising depth. I’ve tried this with old book pages and with plain kraft paper, and both looked lovely. It takes patience but no special skill. Choose white for a clean look, sage for a calm one, or a mix for variety. It’s a relaxing afternoon project, and the final tree feels delicate, handmade, and ready to be admired on any table.
Use medium-weight paper so the pleats hold their shape without sagging. Fold each strip into even creases, about half an inch wide, and press them firmly with a ruler. Staple or glue the ends together, then thread the rounds onto a wooden skewer or paper cone from largest to smallest. A small paper star finishes the top. Keep the tree away from damp areas, because moisture softens the folds. The finished piece looks clean, airy, and modern, and it can be displayed again next year. Gift it to a neighbor, and it becomes a thoughtful, handmade present.
Conclusion
A beautiful holiday corner doesn’t need a traditional tree. It needs a little creativity and a few simple materials. Whether you choose a ladder, a stack of books, or a pleated paper cone, each idea proves that cozy, stylish decor can be easy, affordable, and truly yours. I’ve seen how small changes like these can completely transform a space, often in just one afternoon. If you love the look of an IKEA Christmas tree, you now have 15 handmade ways to bring it home. Save this post on Pinterest, try one idea this weekend, and share it with a friend who needs holiday inspiration.