15 IKEA Christmas Tree Alternatives for Christmas in a Dorm Room
IKEA Christmas tree alternatives for a dorm room are small, wall-mounted, flat-packed, or tabletop options that give you a festive corner without needing the floor space of a full-size tree. This article covers 15 of them, ordered from the simplest to the ones that take an afternoon. Most cost between $5 and $40, and a few cost almost nothing if you already own string lights and tape.
Here’s the practical problem. IKEA’s VINTERFINT trees are good, but the 59 inch size is about 26¾ inches wide and the 70¾ inch size is about 40¼ inches wide. A standard twin XL mattress is roughly 38 by 80 inches. In a shared room, a tree that wide takes real space, and it has to be stored somewhere over winter break. IKEA does sell small potted trees, but a lot of students don’t live near a store, and shipping fees add up. That’s why alternatives make sense.
Before you buy anything, read your school’s housing rules. Most colleges ban candles, open flames, and real cut trees in residence halls, and many limit the type of lights and power strips you can use. Some charge for wall damage at move-out. Five minutes with the handbook saves you from a confiscated tree or a fine.
Jump To
- Why Dorm Rooms Need Different Tree Ideas
- The 15 Alternatives, Simplest First
- How to Start
- What Goes Wrong When You Skip a Step
- Frequently Asked Questions
- Final Thoughts
Why Dorm Rooms Need Different Tree Ideas
Space is the first limit. Dorm rooms are small and shared, and a lot of the floor is already taken by beds, desks, and storage. A freestanding tree competes with your walkway, and a roommate may not want it at all. Anything that goes on a wall, a window, or a desk avoids that argument.
The second limit is rules. Fire safety is the reason most schools prohibit real trees and candles. LED lights run cooler than incandescent bulbs, which is why they’re the safe default. A surge protector with a built-in circuit breaker is often required, and daisy-chaining power strips is almost always banned. I’d check the exact wording in your housing handbook, since it varies by school.
The third limit is storage and move-out. Whatever you buy has to fit under a bed or in a closet in January, and anything you stick to a wall has to come off without taking paint with it. That’s why a lot of the ideas below fold flat, use removable hooks, or live on a desk.
Also, most dorm decorating is temporary. You may only be in the room for a few weeks of December. A cheap, light setup that you can pack in ten minutes is better than a nicer one that’s a hassle to take down before you leave for break.
Quick Reference
- Best starting point: String lights shaped into a tree on the wall or window
- Biggest impact: Warm white lights, since they make any shape read as a tree
- Budget to start: Roughly $10 to $40 (approximate, prices vary)
- Time: 15 minutes for the simplest ones, an afternoon for the craft projects
The 15 Alternatives, Simplest First
1. A 2 to 3 Foot Pre-Lit Tabletop Tree

This is the closest thing to a real tree you can fit on a dresser or desk. Pre-lit tabletop trees come in roughly 2 to 3 foot heights, with lights already wired into the branches, so there’s no wrapping and no tangled strands. Plug it in, fluff the branches, and add a few ornaments.
Setup note: Put it on a flat, stable surface and keep it a safe distance from anything that could get hot. Fluff each branch outward and in different directions, working from the bottom up, because a tree that hasn’t been fluffed looks thin. Most small trees take about five minutes to open up.
Plug note: Look for a UL or similar safety listing on the tag near the plug, since some schools require it. Plug the tree into a surge protector instead of directly into a power strip that’s already full. If your school requires a specific type, buy that first and the tree second.
Shop This Look
2. A Fairy Light Tree Hung on the Wall
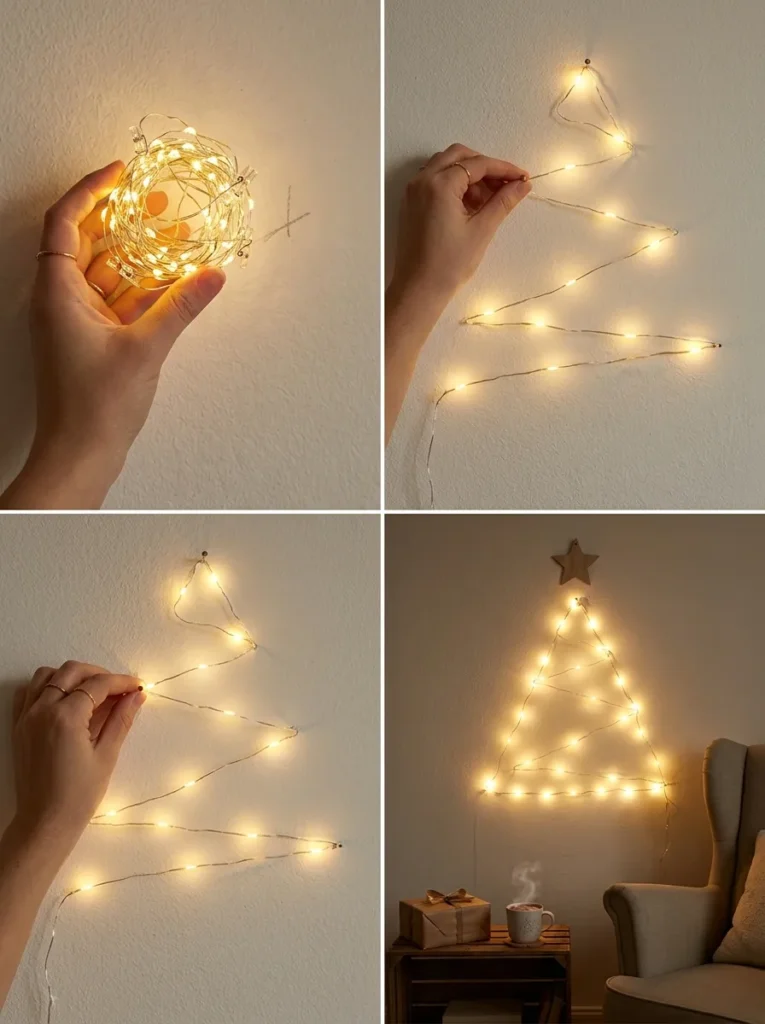
You don’t need a tree to make a tree shape. A string of fairy lights hung in a zigzag on the wall reads as a triangle, and with warm white lights it looks like a glowing outline of a tree. It takes about 15 minutes and costs whatever the lights cost.
Layout note: Use a 10 to 20 foot LED string. Put one hook at the top for the point, then run the lights back and forth in wider rows going down. Mark the spots with a pencil first, or lay the string on the floor in the shape you want before you hang it, so you’re not guessing.
Hook note: Use removable adhesive hooks designed for lightweight loads. Clean the wall with rubbing alcohol, press each hook firmly for the time printed on the package, and wait before hanging anything. To remove them, pull the tab slowly and parallel to the wall. Textured cinder block walls are a problem, because adhesive doesn’t grip well, so try a door or window instead.
Shop This Look
3. A Washi Tape Tree on the Wall
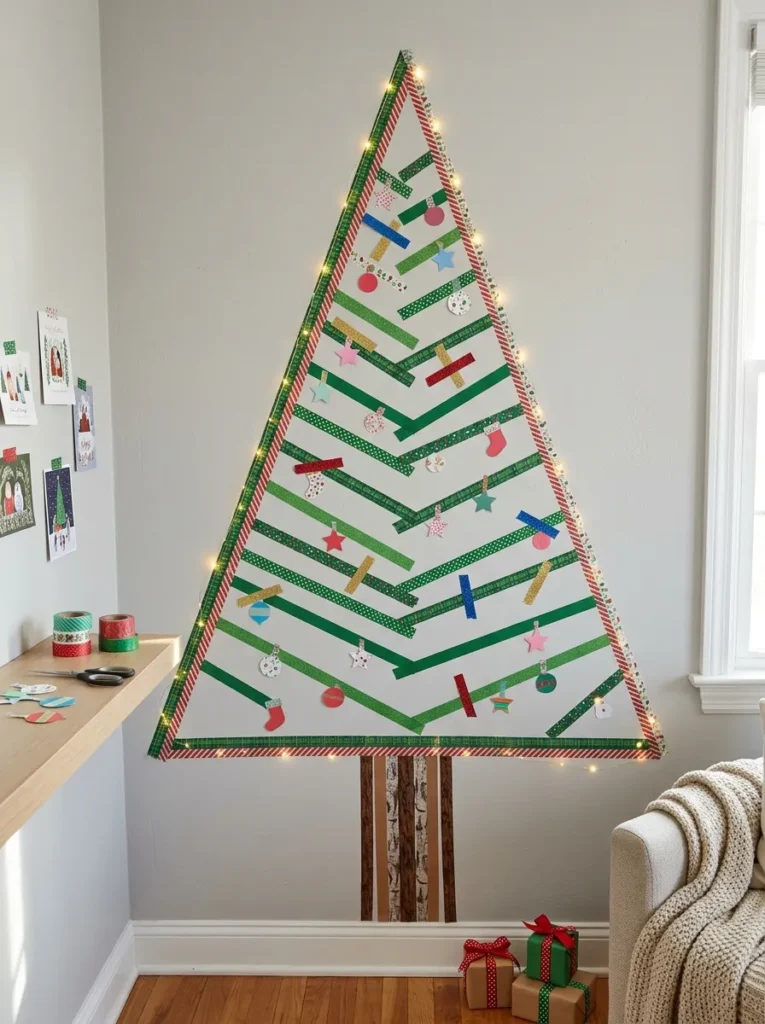
This one costs about $5 and needs no hardware. Use washi tape to draw a triangle on the wall, then fill it in with a trunk and a few strips for branches, and stick small paper or tape ornaments on it. It works well on a plain painted wall, and it looks bigger than you’d think.
Tape note: Choose low-tack washi tape and test it on a hidden spot first. Some paints peel when you pull tape off, especially cheap dorm paint. Press the tape lightly and don’t rub it down hard. Pull it off slowly at a low angle when you’re done.
Design note: Use three colors at most, like green, white, and gold. Cut small circles from the tape with scissors for ornaments, and stick a few paper stars on top. A simple design looks better than a busy one, and it’s quicker to remove at the end of the semester.
Shop This Look
4. A Garland Tree Shaped Into a Triangle
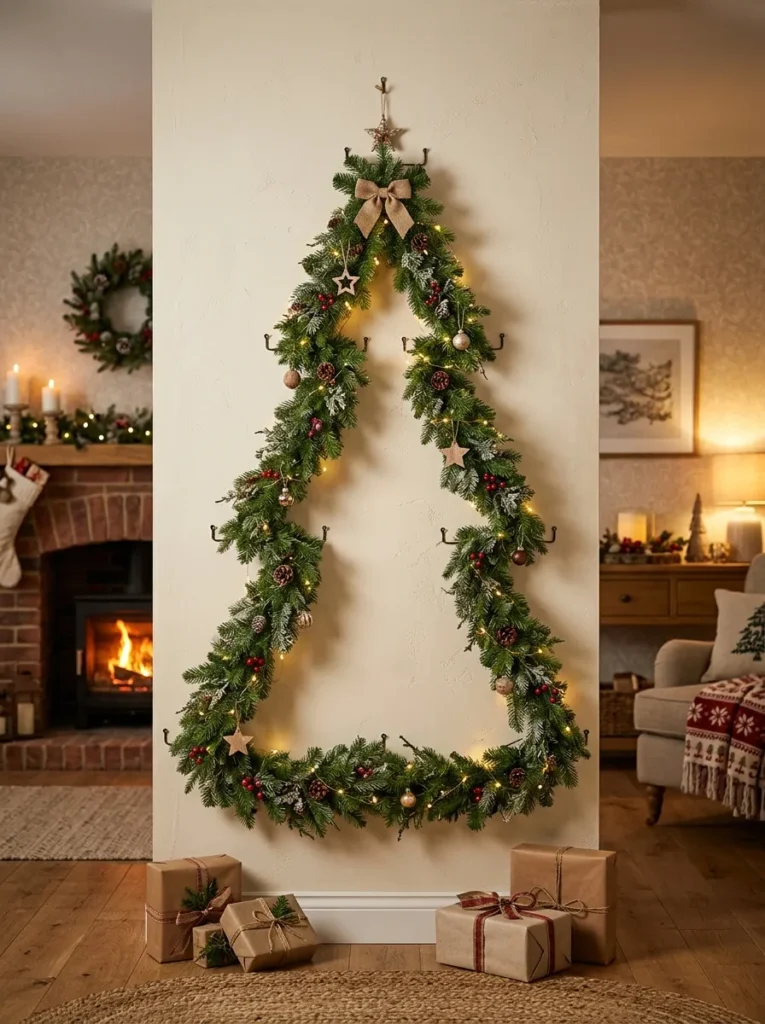
A length of garland pinned or hooked into a triangle gives you a green tree shape with a lot more texture than tape. You can use a plain green garland, a tinsel one, or a paper one. It’s light, cheap, and you can reuse it every year.
Shaping note: Use three removable hooks to make the triangle, one at the top and two at the bottom corners. Run the garland from the top to the left corner, then to the right corner, then back up to the top. Add a few extra loops inside if you want it to look fuller.
Fill note: Hang light ornaments from the garland with thin thread or small hooks. Skip heavy glass ones, since adhesive hooks can’t hold much. Fabric, paper, and plastic ornaments are better. Put a small star on the top hook as a topper.
Shop This Look
5. A Faux Branch in a Vase With Ornaments
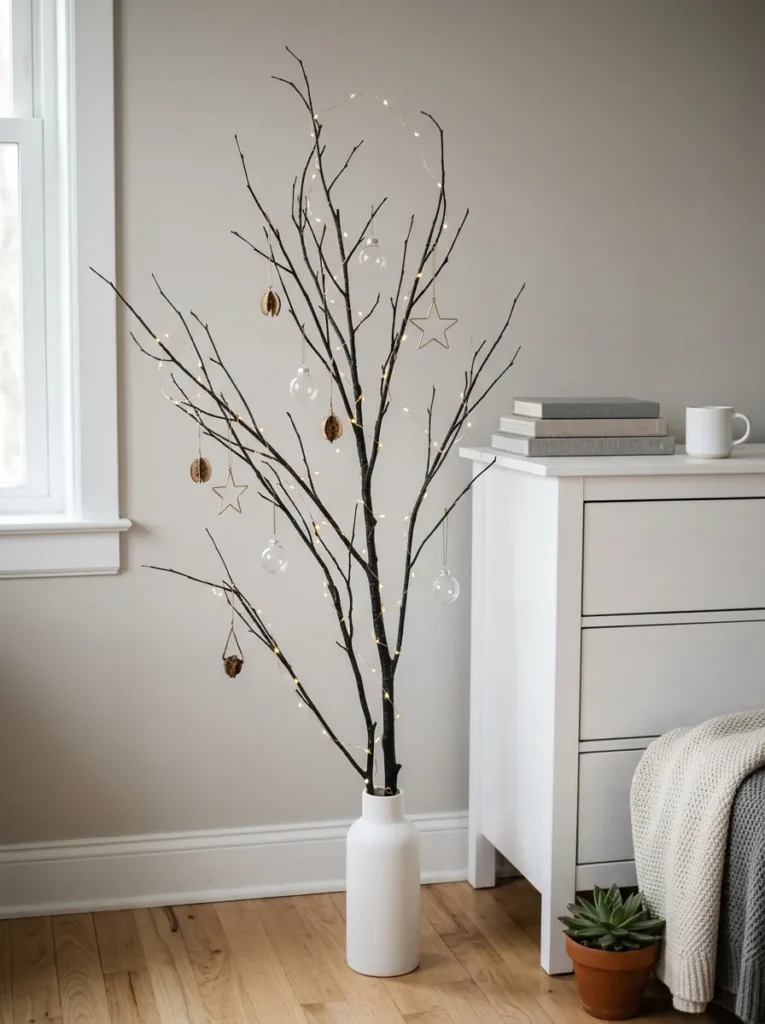
A tall faux branch in a vase is a minimalist tree that fits on a desk or the floor next to a dresser. A white birch or bare black branch looks modern and takes up almost no space. You hang a few ornaments and a string of micro lights, and it’s done.
Branch note: Buy faux, not real. A real branch can carry insects and dries out, and some schools don’t allow cut greenery. A faux birch or twig branch about 3 to 4 feet tall looks natural and lasts for years. Put it in a heavy vase or fill the base with rocks so it doesn’t tip.
Weight note: Thin branches only hold light ornaments. Use felt, paper, or small plastic balls, and space them out. If the branch droops, hang the heavy ones near the base and put the lightest ones at the tips. A few ornaments look better than a lot.
Shop This Look
6. A Stacked Books Tree

Stack hardcover books from largest at the bottom to smallest at the top, and you get a tiered tree shape. Wrap a string of lights around the stack and add a small star on top. You already own the main material, which makes this the cheapest option here.
Stacking note: Use books of similar thickness and shape so each layer looks even, and line up the spines facing out. Keep the stack low enough to stay stable, about 5 or 6 books at most. A wobbly stack falls over when someone bumps the desk.
Light note: Wrap a battery string around the books loosely and tuck the battery pack behind the stack. Don’t use textbooks you might need that week. If a book is a rental, keep lights and tape off it, since damage can cost you.
Shop This Look
7. A Felt Wall Tree Kit

A felt tree kit gives you a flat green tree that hangs on the wall, with felt ornaments you can move around. It’s a good choice if you like crafts and want something you can keep adding to. Kids’ advent-style felt trees work too, and they pack flat.
Mount note: Use a removable hook at the top and one or two at the bottom to keep it flat. Felt is light, so small adhesive hooks are fine. If the wall is rough, hang it on the back of your door instead.
Ornament note: Some kits use stick-on pieces and others use Velcro dots. Stick-on pieces can lose their grip after a few weeks, so check them before you leave for break. You can swap the pieces around to change the look, which is fun for a shared room.
Shop This Look
8. A Flat-Pack Cardboard Tree

Cardboard trees come flat and fold or slot together in a few minutes, and they fold flat again for storage. They’re light, cheap, and some have shelves or cut-outs for ornaments and small gifts. IKEA has had paper-based tree options in its recent collection, but similar flat-pack ones are easy to find elsewhere.
Assembly note: Follow the slots carefully and press each piece fully into place. If a slot is loose, a small piece of tape on the inside holds it. Put it on a desk or the floor away from walkways, since cardboard bends if someone bumps it.
Care note: Keep it dry and away from heat. Don’t wrap lights around it unless they’re LED and low heat, and don’t leave it near a window with condensation. Flatten it carefully at the end of the season and store it under the bed. A creased tree stays creased.
Shop This Look
9. A Wire Cone Frame Wrapped in Lights
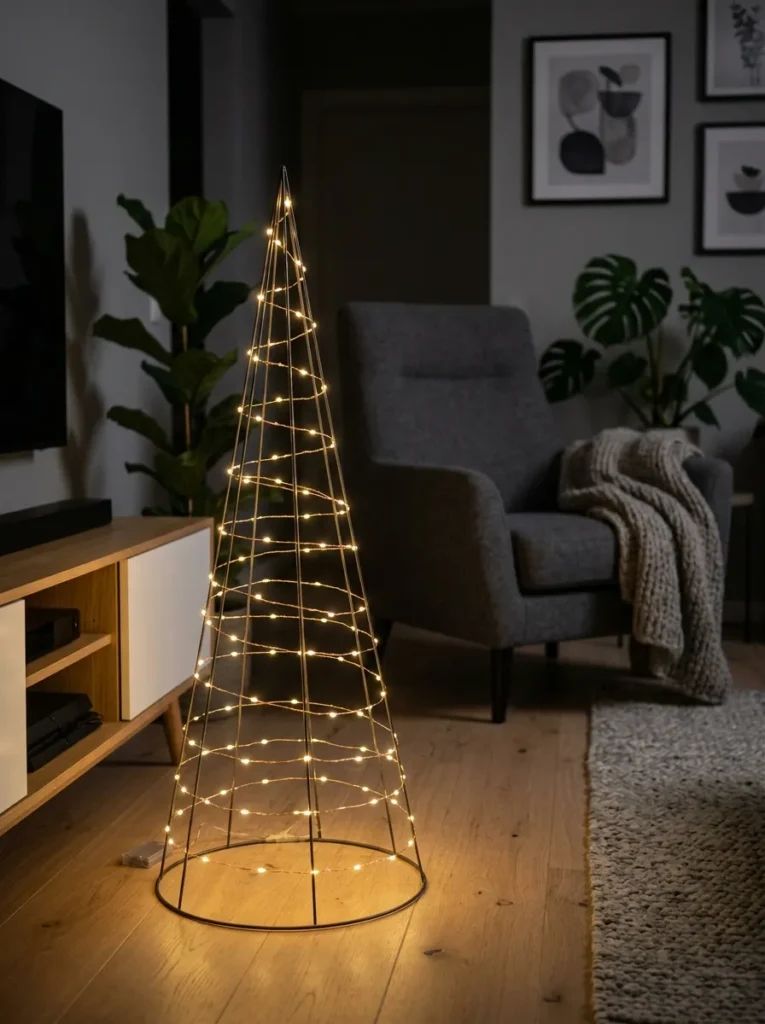
A wire cone frame is just the outline of a tree, and you wrap it in lights to make it glow. It’s light and often folds flat, and the open structure means no dust or needles. It looks modern, especially in a dark room.
Wrap note: Start at the bottom and spiral the lights upward, keeping the gaps even. A 50 to 100 bulb string usually works for a 2 to 3 foot cone. Tuck the wire end into the top and plug in the other end. Test the lights before you wrap.
Stability note: A cone frame is light, so it can tip if you bump it. Put it in a corner or on a table where it won’t get knocked over. Some frames have a weighted base and some don’t, so check the one you buy. If it’s wobbly, tape the base down with removable tape.
Shop This Look
10. A Small Living Rosemary Tree
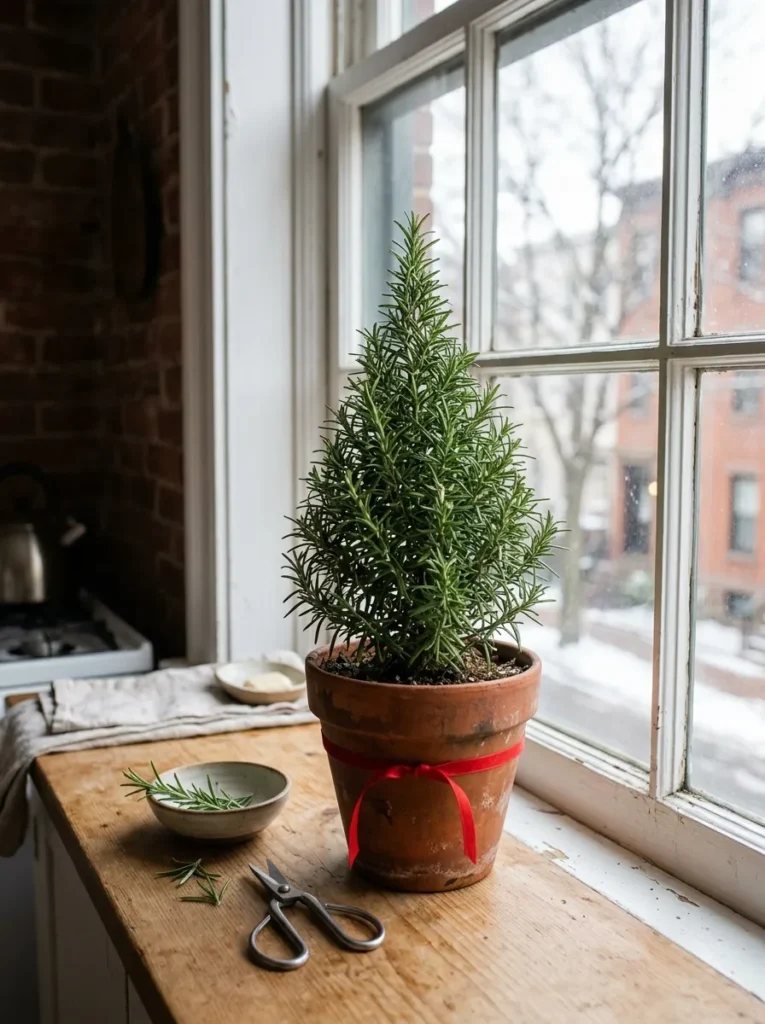
A small potted rosemary shaped like a cone is sold in December as a living Christmas tree, and it fits on a windowsill. It smells good and you can snip leaves for cooking if you have a kitchen. It’s a real plant, which many dorms allow, but check the rules first.
Care note: Rosemary needs bright light, so put it in the sunniest window. Water when the top inch of soil feels dry, and don’t leave it sitting in a full saucer, because overwatering is the usual way it dies. Dorm air is dry, which also stresses it, so don’t put it next to a heater.
Decorating note: Add only tiny ornaments and a thin string of battery lights. Heavy decorations bend the stems. Keep it away from sprays or glitter, especially if you plan to cook with it. After the holidays, it’s a regular plant you can keep or give away.
Shop This Look
11. A USB-Powered Desk Tree

Some mini trees and light-up cones run on USB, so you can plug them into your laptop, a power bank, or a wall adapter. That means no extra outlets, which is useful when you only have one near the desk. They’re small, usually under a foot tall, and they sit next to your monitor.
Power note: USB lights draw very little power, but a lot of them plugged into one laptop can run the battery down. Use a wall adapter if you leave them on all day. A power bank with a timer works well and lets you place the tree anywhere.
Cable note: Tape the cable down along the back of the desk with removable tape so it doesn’t get tugged. Keep drinks away from the tree and the cable. If liquid spills on a USB connection, you can fry a laptop port, so keep the setup away from the edge.
Shop This Look
12. A Leaning Ladder Shelf Tree
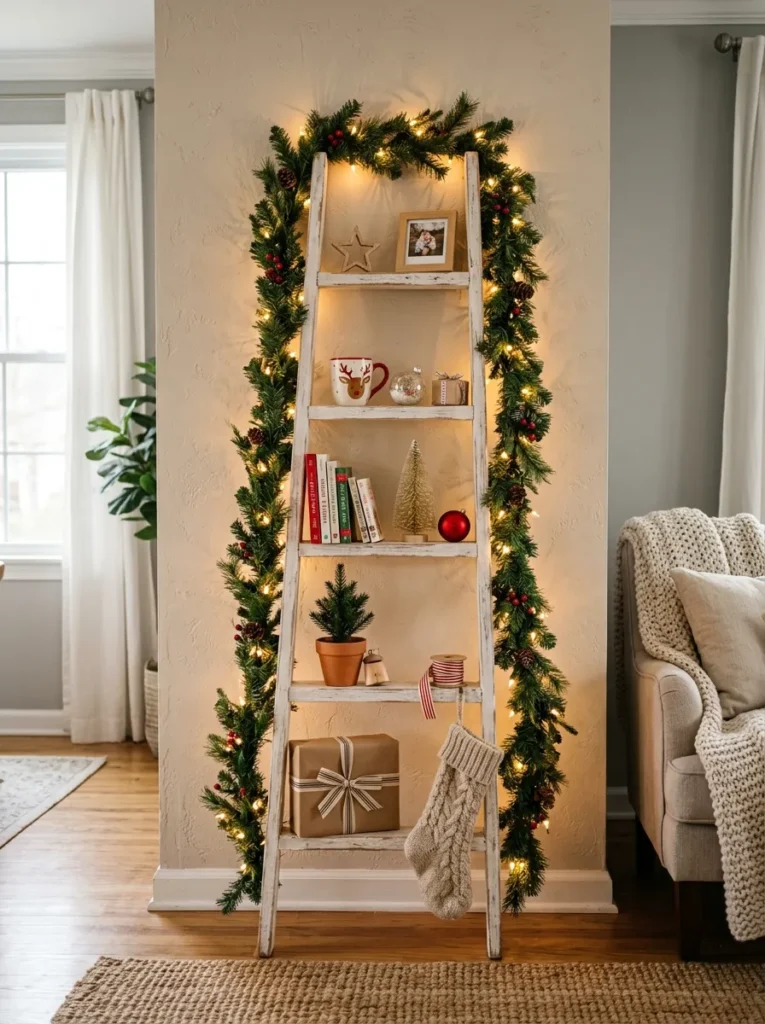
A decorative leaning ladder against the wall can become a tree if you wrap it with garland and lights. It works as a shelf too, so you can put small ornaments, mugs, or gifts on the rungs. It’s a larger project, but it doubles as furniture you keep after the holidays.
Stability note: Lean it at a steady angle on a flat floor, and check that it doesn’t wobble when you touch it. Some dorms don’t allow furniture that attaches to walls, so a freestanding ladder is the safer option. Put a rubber pad under the feet to keep it from sliding.
Decor note: Weave the garland over and under the rungs and wrap lights along the sides. Keep the items on the rungs light, since the shelves are thin. A few small ornaments and a mini wreath look better than lots of stuff piled up.
Shop This Look
13. A Paper Chain Tree on the Door
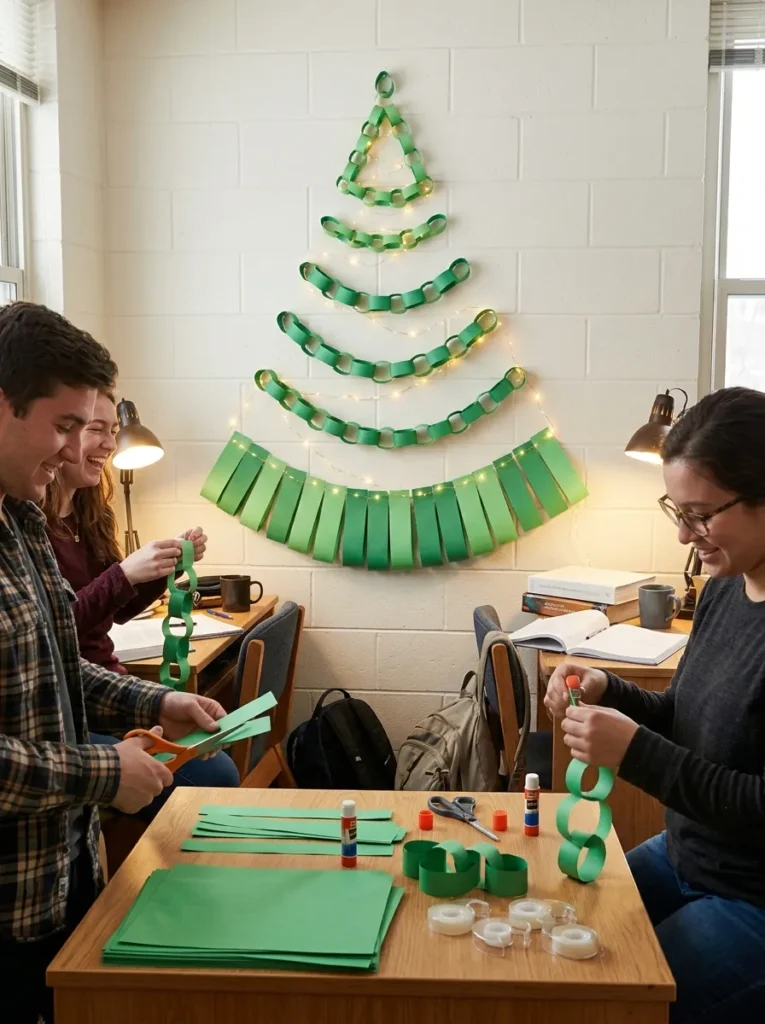
Cut strips of green construction paper, loop them into chain links, and make each row of links smaller as you go up. When you hang the chains from the top, they form a tree shape. It’s a cheap project, good for a study break, and you can do it with friends.
Chain note: Use a stapler or glue stick for the links. Start with a few links for the top and add a few more per row. A tree about 3 feet tall needs roughly 12 to 15 rows. Mark your sizes on a piece of paper first so the shape looks even.
Door note: Hang the chains with removable putty or small adhesive hooks. Doors with a smooth finish work best. Don’t use tape that could pull paint off. Check that the door still opens and closes without the chains getting caught in the frame.
Shop This Look
14. A Window Light Tree
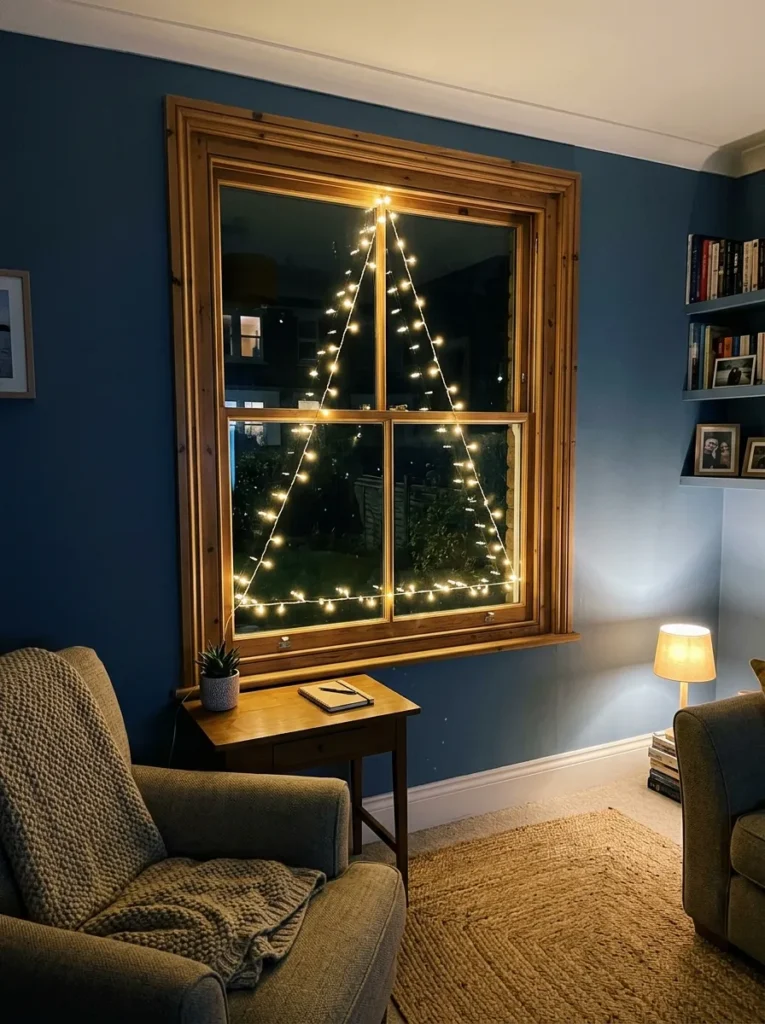
Hang lights in a triangle on your window and the shape shows from inside and out. It’s a nice option if your wall space is limited, and it makes the room look cozy at night. It also leaves your desk and floor free.
Hanging note: Use clear suction cup hooks or removable clips, not tape, because tape can leave residue on glass. Hang the string in a zigzag the way you would on a wall, with a point at the top. A 10 to 15 foot string is usually enough for a standard window.
Moisture note: Windows get condensation in cold weather, and water can get into electrical connections. Use LED lights rated for indoor use and keep the plug and battery pack off the window sill where drips collect. If you see moisture near the plug, unplug it and move the setup.
Shop This Look
15. A Collapsible Pop-Up Tree
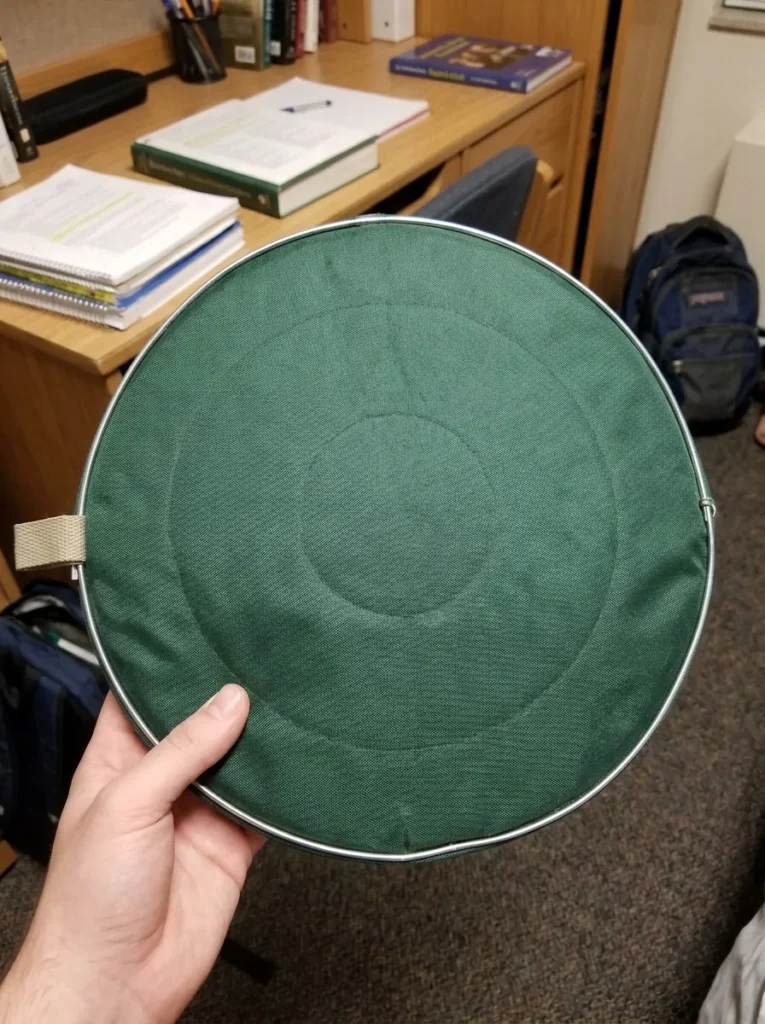
Pop-up trees fold down into a flat disc or a small bag and spring open when you take them out. A 3 foot version is easy to carry home at the end of the semester, and you can use it again next year. They’re good if you want something that looks like a tree but doesn’t take up storage.
Setup note: Let it open fully for a few minutes before you do anything else. Fluff and shape the branches and check that the base sits flat. Some pop-up trees come pre-lit and some don’t, so check the listing. Plan about 10 minutes for setup.
Storage note: Fold it using the instructions on the package, because it’s easy to get stuck halfway. Keep the bag it came in, since the tree won’t fit in a normal box once it opens. Store it flat under the bed or in a closet. If it doesn’t hold its shape, check whether the frame bent in storage.
Shop This Look
How to Start
Start with lights. A single string of warm white LEDs and two or three removable hooks gives you a wall tree in 15 minutes, and it costs about $10 to $15. If you like how it looks, build on it with garland or ornaments. If you don’t, you’ve spent very little.
The most common mistake is buying before reading the housing rules. Students buy a real tree, a plug-in heater-style light, or a candle, and the resident advisor takes it at the first room check. Read the handbook, ask your RA if something is unclear, and keep the receipt in case you need to return an item.
Three things under $50 get you started: a string of warm white LED lights, a pack of removable adhesive hooks, and a surge protector with a circuit breaker. Together they usually cost under $50, depending on the brand.
For timing and budget, the wall and window ideas take 15 to 30 minutes. Craft ideas like the washi tape tree, paper chain, or felt kit take an afternoon. A starter setup runs about $10 to $40. A tabletop tree with ornaments might reach $60 to $80, so decide how much you want to keep after the semester.
Shop This Look
- Warm white LED string lights
- Removable adhesive hooks, assorted
- Surge protector with circuit breaker
What Goes Wrong When You Skip a Step
Most problems in a dorm are about rules and wires, not style.
The first problem is fire risk. Candles, incandescent lights, and real greenery near a heat source cause most holiday dorm fires, and that’s why schools ban them. LED lights, battery-powered options, and faux trees are safer. Even so, turn lights off when you leave the room or go to sleep.
The second is overloaded outlets. Plugging several strings into one power strip, or chaining strips together, can overheat the strip. Check the wattage on the label, and use only as many strings as the instructions allow. Most LED strings use very little power, but cheap ones vary.
The third is wall damage. Adhesive that’s too strong, tape left on for weeks, or nails can leave marks and cost you at move-out. Test a small spot, use products labeled removable, and take everything down slowly at the end of the term.
The fourth is hanging too much weight. Adhesive hooks have a weight limit printed on the package, and glass ornaments exceed it fast. When something falls at night, it wakes your roommate and sometimes breaks. Stick to lightweight ornaments.
The fifth is storage. A tree that doesn’t fold flat ends up crammed into a closet or left on the floor. Think about where it goes in January before you buy it.
Frequently Asked Questions
Can I have a Christmas tree in my dorm room?
It depends on your school. Many colleges ban real cut trees and candles but allow small artificial trees, especially tabletop ones. Some limit the height or require fire-retardant labels. Check your housing handbook or ask your resident advisor before buying.
What is the safest way to light a dorm Christmas tree?
Use LED lights, since they stay cooler than incandescent bulbs, and plug them into a surge protector with a circuit breaker if your school allows it. Battery-powered strings avoid outlets altogether. Turn the lights off when you leave the room or go to bed.
How do I hang decorations without damaging dorm walls?
Use removable adhesive hooks or poster putty made for walls, and test a small hidden spot first. Press each hook firmly for the time listed on the package, and remove it by pulling the tab slowly parallel to the wall. Rough cinder block walls hold adhesive poorly, so a door or window may work better.
How much does a dorm Christmas tree alternative cost?
Most of these cost between $5 and $40. Light-based ideas are the cheapest, since you only need a string and some hooks. Pre-lit tabletop trees and pop-up trees cost more, and prices vary by season and store.
What’s the easiest Christmas tree alternative for a dorm?
A fairy light tree on the wall or window. It takes about 15 minutes, needs only lights and a few removable hooks, and it packs away in a small bag. It also gives you the glow of a tree without taking up floor space.
Final Thoughts
Fifteen alternatives is more than you need, and most students will pick one or two. They run from a $5 tape tree to a living rosemary plant, and from a wall of lights to a pop-up tree that stores in a bag. Choose based on your room, your rules, and how much effort you want to put in.
Today, check your housing handbook for the rules on lights, trees, and wall adhesives, and write down what’s allowed. That one step saves you the most trouble. Save your favorite IKEA Christmas tree alternatives to a Pinterest board so you have them ready when you start decorating.
Keep Exploring
- 12 Dorm Room Christmas Decor Ideas Without Damaging Walls
- 10 Cheap DIY Christmas Ornaments Students Can Make
- 15 Small Space Christmas Tree Ideas for Apartments